C# - Print
將列印的功能可以寫成一支小工具,方便日後有重覆需求,或其他人也有相同需求的時候使用。日後如果有其他需求,可以再把這支小工具加強。建立自己的照片列印小幫手
工作專案及類別庫專案
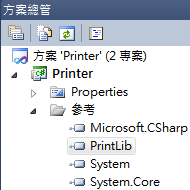
在一個方案中開2個專案,一個是有視窗的專案,另一個則是只會產生dll的類別庫專案。整個流程:類別庫專案->發佈dll檔->主要專案(把dll加入參考) ->使用dll中的類別
加入參考
在類別庫專案中記得要先「加入參考」System.Drawing。 接著在程式碼中加入
using System.Drawing.Printing;
using System.Drawing;類別庫專案(PrintHelper)必需先寫,寫好後發佈,會產生一個 dll 檔。在工作專案中的「加入參考」中把這個 dll 檔加入。如此就可以用這個寫好的小幫手了。
幾個小提示
- 在呼叫Print()方法之後,整個列印動作才會執行。
- DefaultPageSettings屬性可以設定相關的頁面設定值。其中的Landscape可以設定紙張是直印或橫印。
- PrintPage事件是當Print()方法呼叫後觸發的事件。
- 要送出什麼資料給印表機,是在PrintPage的事件處理函式中設定。這個例子會需要從檔案取得Bitmap資料,然後用Graphics的DrawImag方法把照片畫到印表機。
- 請對Bitmap所取得的照片解析度做設定,印表機請設為300(dpi)。
- 最後記得把Bitmap所取得的資源釋放掉(Dispose)。
照片列印小幫手的程式碼
using System;
using System.Collections.Generic;
using System.Linq;
using System.Text;
using System.Drawing.Printing;
using System.Drawing;
using System.IO;

namespace PrintLib
{
public class PrintHelper
{
//要列印的檔案名稱(含路徑)
private string imageFile = "";
//是否要橫式列印
private bool landscape = true;
//列印物件
private PrintDocument printer;

public string ImageFile
{
get { return imageFile; }
set { imageFile = value; }
}

public bool Landscape
{
get { return landscape; }
set { landscape = value; }
}

public void printing()
{
//設定列印方向
printer.DefaultPageSettings.Landscape = landscape;

try
{
//執行列印
printer.Print();
}
catch (FileNotFoundException ex)
{
throw new FileNotFoundException();
}

}

public PrintHelper()
{
init();
}

private void init()
{
//建立列印物件
printer = new PrintDocument();
//加入列印事件(當要送出資料列印時觸發)
printer.PrintPage += new PrintPageEventHandler(printer_PrintPage);
}

//送出列印事件
private void printer_PrintPage(object sender, PrintPageEventArgs e)
{
Bitmap bmp;

if (imageFile != "") {
//從檔案取得點陣圖資料
bmp = (Bitmap)Image.FromFile(imageFile);
//設定點陣圖的解析度(300dpi為列印品質)
bmp.SetResolution(300, 300);
//叫印表機開始"畫圖"
e.Graphics.DrawImage(bmp, new Rectangle(0, 0, 619, 416));
//上面是確切知道相片紙的大小,所以設定一個方形尺寸
//如果不知道尺寸,可以設定從左上角開始畫
//e.Graphics.DrawImage(bmp, new Point(0,0));

//把資源釋放掉
bmp.Dispose();
}

}

}
}
使用列印小幫手
照片列印小幫手已經把大部份的處理動作都封裝起來了,使用時只要幾行就可以做到列印照片。(記得把發佈的dll「加入參考」到這個專案中)這邊只做了一個按鈕,按下後直接執行列印。
程式碼如下:
private void btnPrint_Click(object sender, EventArgs e)
{
//建立列印小幫手
PrintHelper printHelper = new PrintHelper();
//指定照片的檔案位置
//這裡是寫死的,可改成選取檔案的方式來取得
printHelper.ImageFile = @"D:\temp\mini.jpg";
//因為照片是橫的,所以設成橫向
printHelper.Landscape = true;

try
{
//參數都設定好了,叫小幫手開始列印吧~
printHelper.printing();
}
catch (FileNotFoundException ex)
{
MessageBox.Show("找不到檔案.");
}

}
我要留言
留言小提醒:
1.回覆時間通常在晚上,如果太忙可能要等幾天。
2.請先瀏覽一下其他人的留言,也許有人問過同樣的問題。
3.程式碼請先將它編碼後再貼上。(線上編碼:http://bit.ly/1DL6yog)
4.文字請加上標點符號及斷行,難以閱讀者恕難回覆。
5.感謝您的留言,您的問題也可能幫助到其他有相同問題的人。